There are mainly two ways to update data in ADO.NET:
- in connected mode, using SQL queries to directly insert, update and delete data objects in a given data store, and
- in disconnected mode, using ADO.NET methods to add, edit, and remove data objects in a cached DataRow, DataTable, or even an entire DataSet, then merging the changes back into the data source.
In this session we cover the first scenario, focusing on key concepts and techniques to enable users to interact with data at the database level.
To help better appreciate the tutorials, here we shall step through a simple yet educational guest book application that essentially demonstrates how to
- implement basic connectivity with a database management system, and
- enable users to access and manipulate information stored in a database.
 NOTE: While the samples illustrate working with the SQL Server™ .NET Data Provider, the methods apply to OleDb data sources as well.
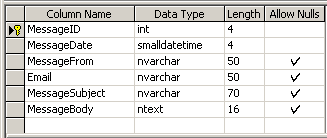
For these exercises, we shall be using a table named "Messages" from our sample database. For your guidance, the table is structured as follows:

Fig. 1. Fields Structure of Messages Table
The following briefly describes what each field in the Messages table is used for, and lists the valid types of values that can be stored for each.
| Field Name |
Data Type |
Description |
| MessageID |
AutoNumber |
Autogenerated unique message identifier ( read-only ) |
| MessageDate |
Date/Time |
Stores the date/time when the message was created |
| MessageFrom |
Text |
Identifies the person leaving the message |
| Email |
Text |
Stores the email address of the person leaving the message |
| MessageSubject |
Text |
Identifies the subject/content of the message |
| MessageBody |
Memo |
Stores the body of the message |
 NOTE: For a general understanding of all the data types that can be used in SQL Server™, see the SqlDbType enumeration.
Before we proceed, it would be helpful at this point to briefly examine two new ASP.NET-specific features that are implemented in the sample application.
- the
web.config file, which we use for storing and retrieving the connection string to the database, and
- the Panel server control, which we use for handling the layout of the Web Forms pages.
In Connecting to a Database, we have shown the essential steps to establish and open a connection to a data source from within a Web Forms page.
In this exercise, we use a slightly different approach of storing the connection string in the application configuration file ( web.config ), thereby making the connection string globally available to any page in the application.
This technique is basically implemented as follows.
In the web.config file for the application, include the following:
<configuration>
   <appSettings>
      <add key="myDbConn"
         value="server=servername; uid=userid; pwd=password; database=dbname" />
   </appSettings>
</configuration>
changing the values ( shown in italics ) to correspond to your settings.
Then on each page that you need to initialize a connection, use:
SqlConnection myConn = new SqlConnection
   ( ConfigurationManager.ConnectionStrings [ "myDbConn" ] );
Dim myConn as new SqlConnection
( ConfigurationManager.ConnectionStrings ( "myDbConn" ) ); |
| |
C# |
VB |
For detailed information on using the web.config file, see ASP.NET Configuration and ASP.NET Configuration Sections.
All the Web Forms pages in the sample application post back to the same page. And, since the user interfaces we have to provide at page load and at post back are different, we need some way of laying out the page structure to correspond with the program flow.
With traditional ASP, we can typically intersperse HTML within ASP script blocks, and while still possible with the .NET page framework, ASP.NET provides a more effective way of handling page layout with the Panel server control.
The <asp:Panel> control provides a container for other controls, and is especially useful when you need to generate controls programmatically or to hide and show a group of controls.
The samples presented in this series make use of this technique to contain the separate interfaces for page load, post back, and for whatever other user interface is needed.
To specify which panel is in use, we simply switch the respective control’s Visible property to either true or false in the Page_Load event handler. 